


Home»eSIM»Install eSIM on Android
How to Install an eSIM on Android (Pixel and Samsung Differences Included)
By  Ignas Simkus|Last updated: 22 July 2026|How we test
Android eSIM installs are five minutes of work once you find the right menu, and finding the right menu is the actual problem: every manufacturer hides it somewhere different. Here are the exact paths for Pixel and Samsung, the checks to run first, and the one setting that trips everyone after landing.
Article Summary
- Check first: eSIM-capable model, carrier-unlocked
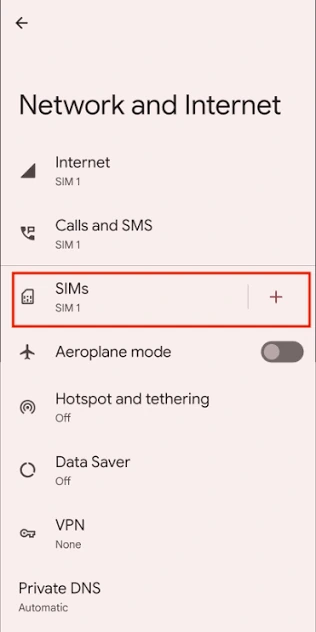
- Pixel: Settings › Network & internet › SIMs › Add SIM
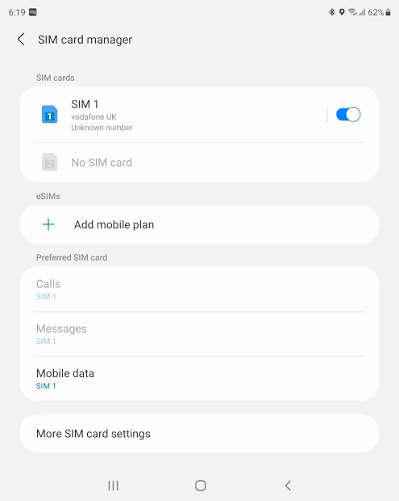
- Samsung: Settings › Connections › SIM manager › Add eSIM
- On landing: travel eSIM as data SIM, data roaming on for that SIM
Does your Android support eSIM?
Support arrived in waves, and it is patchier than on iPhone. As a rule: Pixels from the Pixel 3 onward, Samsung Galaxy S and Note flagships from the S20 family onward, and Galaxy Z folding phones all support eSIM. Mid-range models are where it gets unpredictable, and some regional variants ship without eSIM even when the global version has it: Samsung’s US and international models have differed on exactly this, so treat any list, including this one, as a starting point and run the ten-second check below.
The reliable test takes ten seconds: open the SIM settings path for your phone below. If an “Add eSIM” or “Download a SIM instead?” option exists, you have eSIM. If it does not, no app can add it. Google documents Pixel support on its Pixel eSIM help page. Other OEMs hide the same feature in their own places: OnePlus and Xiaomi under Settings, Mobile networks (eSIM support varies sharply by model and region), Motorola under Network & internet like the Pixel. The ten-second test above beats any compatibility list.
The unlock check matters just as much: a phone locked to a carrier contract will refuse foreign profiles. If you bought the phone outright, you are almost certainly fine. If it came subsidised on a plan, confirm with your carrier before you travel, not at the airport.
Installing on a Pixel
Buy your plan first, in the provider’s app where possible: app-based installs push the profile straight to the phone and skip the QR dance entirely. If you have a QR code instead, the path is: Settings, Network & internet, SIMs, tap Add SIM, then Download a SIM instead, and scan the code from another screen or a printout.
The Pixel will download the profile, ask which line handles calls, texts and data, and offer to label the lines. Name the new one “Travel data” and leave your home SIM as default for calls and SMS. Keep the travel line switched off until you land.
Installing on a Samsung
Samsung buries the same feature one menu deeper: Settings, Connections, SIM manager, then Add eSIM. From there, Scan QR code does what it says; there is also an option to enter the activation code manually if the code refuses to scan, using the SM-DP+ address from the provider’s email.
Samsung’s SIM manager is also where you will do the post-landing switching, so it is worth a look around while you are in there: each SIM has its own toggle, and Preferred SIMs sets which line carries mobile data.
Travel eSIM QR codes are almost always single-use. Install on the phone you are taking, and never delete the profile mid-trip to troubleshoot: on most providers the same code will not reinstall. Deleting is the last resort that usually costs you the plan.
After landing: three toggles
Turn the travel eSIM on. Set it as the mobile data SIM (Pixel: Network & internet, SIMs, Mobile data; Samsung: SIM manager, Preferred SIMs, Mobile data). Then the one everyone misses: open the travel SIM’s own settings and switch data roaming on. A travel eSIM is technically a roaming service; with roaming off it will sit on no service indefinitely while looking perfectly healthy. This single toggle is the most common “broken” eSIM there is, and it is step one of our 10-minute fix checklist for a reason.
One Android-specific extra: if data still refuses to flow after roaming is on and a restart, check the APN. Whether one needs typing in manually varies plan to plan; if it does, the value is in the provider’s setup email. iPhones handle this silently more often; Android sometimes wants it spelled out.
When the QR code refuses to cooperate
The scan fails for boring reasons with quick fixes. Screen-to-screen scanning struggles with brightness: turn the source screen up, kill dark mode on the email, and hold steadier and further back than instinct suggests. If it still refuses, skip scanning entirely: every provider’s email includes the SM-DP+ address and activation code for manual entry, and typing two strings takes a minute. “Profile download failed” mid-install usually means wifi hiccuped; retry on a solid connection rather than assuming the code is burned, because the code is only consumed by a completed install.
If the phone reports the eSIM as added but no line appears, restart before panicking: profile registration occasionally needs the reboot to surface. And an error saying the code was already used, on a profile you never got working, is a support-chat matter, not a rebuy: providers can see the profile state on their side and reissue when the install genuinely failed.
Buying the right eSIM in the first place
Every travel eSIM resells a local network, so the right provider depends on where you are going, not on the app’s star rating. New to the whole concept? Start with what an eSIM actually is. Ready to buy? The best travel eSIM guide ranks the main providers by trip type, and the destination guides go network by network. Travelling with an iPhone user? Send them the iPhone version of this guide and nobody is debugging anything at the airport.
FAQ
Why can’t I find the eSIM option on my Android?
Two causes in order of likelihood: the phone simply does not support eSIM, which is still true of many mid-range models, or the menu hides under a different name, so look for SIM manager or Mobile network and then Add eSIM. Carrier-locked phones also hide the option entirely.
Do Samsung and Pixel handle eSIMs differently?
Same idea, different menus: Pixel keeps it under Network and internet, Samsung under Connections and then SIM manager. Samsung buries its dual-SIM toggles a little deeper, but both run two active lines without complaint.
Will an eSIM survive a factory reset on Android?
Assume no. Some phones offer to keep eSIMs through a reset, many quietly wipe them, and a wiped travel eSIM usually needs the provider’s support to reissue. Do resets before trips, never during.