


eSIM Not Working Abroad? The 10-Minute Fix Checklist
By  Ignas Simkus|Last updated: 22 July 2026|How we test
You have landed, your eSIM says no service, and your stomach has dropped. Good news: most eSIM failures are one wrong setting, and the fix takes a couple of minutes. Work down this list in order.
Before anything else, one rule that saves people a lot of grief: do not delete the eSIM. Most travel eSIMs are single-use profiles. Delete it and you often cannot reinstall it from the same QR code, so a fixable problem becomes a lost purchase. Everything below leaves the profile in place.
Most likely culprit, check it first: data roaming is switched off. A travel eSIM is technically roaming, so it needs roaming enabled to work. That single toggle fixes a large share of “no service” cases.
The checklist, in order
1. Turn on data roaming for the eSIM
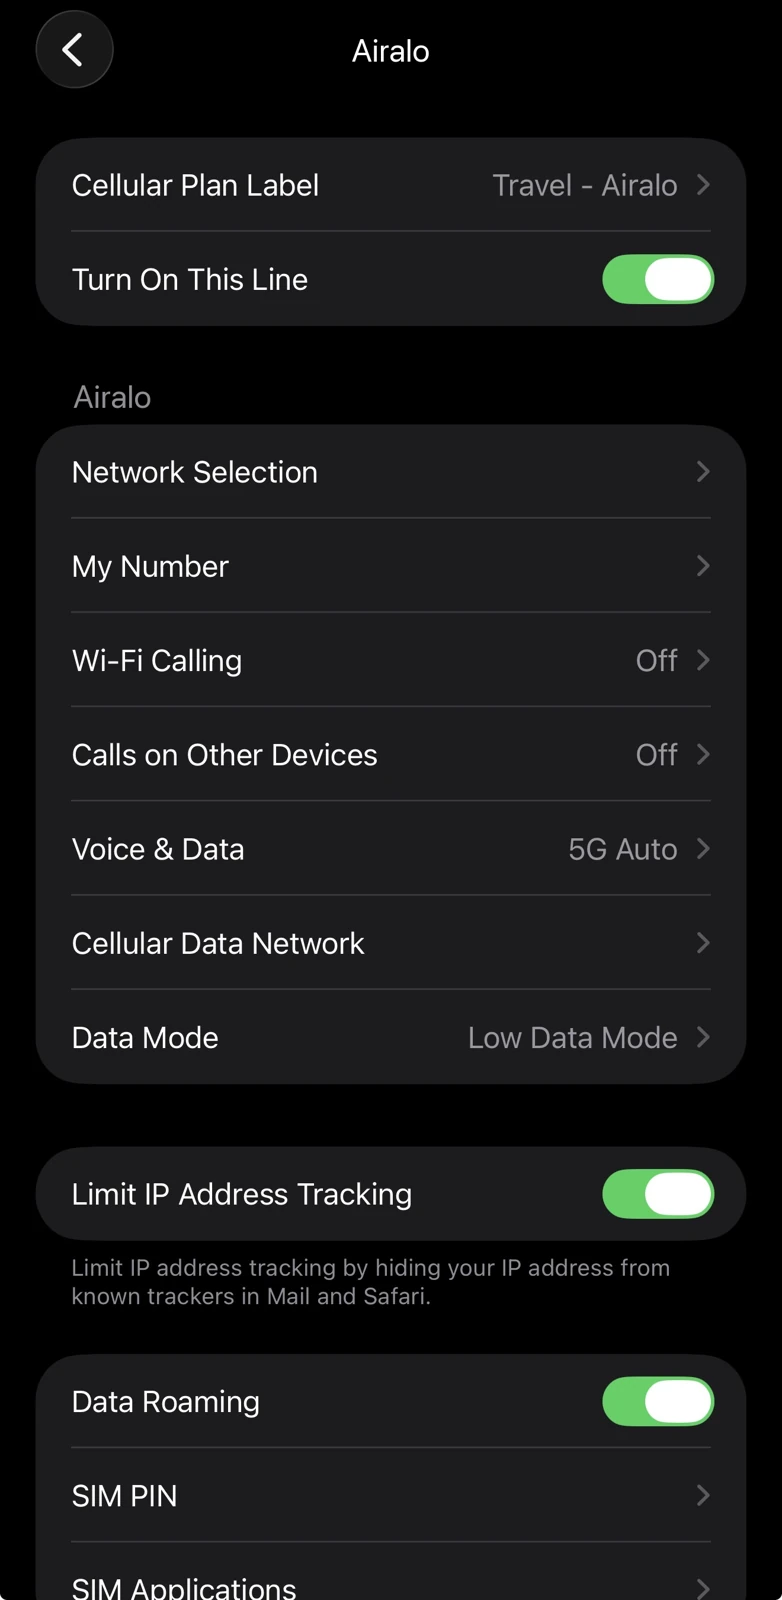
Go to your cellular or mobile data settings, select the travel eSIM line specifically (not your home line), and switch Data Roaming on. Yes, even though it feels wrong to enable roaming. For a travel eSIM it is required.
2. Set the eSIM as your data line
Your phone can hold several lines. Make sure the travel eSIM, not your home SIM, is selected for mobile data. On iPhone this is Settings › Cellular › Mobile Data. On Android it is under SIMs or Network.
3. Toggle airplane mode
Turn airplane mode on, wait ten seconds, turn it off. This forces the phone to search for networks from scratch, and it clears a surprising number of registration hiccups. If that does nothing, a full restart is the stronger version of the same fix.
4. Select the network manually
Sometimes your phone latches onto a network your eSIM provider does not have a deal with, so you have signal but no data. Go to network selection, turn off automatic, and pick the carrier your plan actually uses. If you do not know which one, tap through the options, or set it back to automatic and try again after a restart.
5. Check the plan is active and has data left
Open your provider’s app. Confirm the plan has actually started (some activate on install, some on first connection in-country) and that you have not already burned through the data. This sounds obvious and it catches people constantly.
6. Check your APN settings
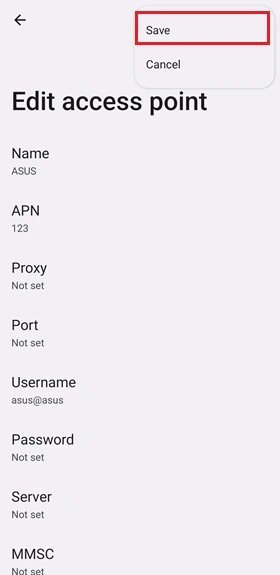
If mobile data still will not connect, the Access Point Name may be missing or wrong. Your provider lists the correct APN in their setup email or app. Enter it under the eSIM line’s mobile data / APN settings. Android asks for this more often than iOS; the Android install guide covers where the APN screen hides on Pixel and Samsung.
7. Turn off any VPN
A VPN can block the initial connection while the eSIM is still registering. Switch it off, get data working, then turn the VPN back on.
8. Walk out of the building
If you just landed, get outside the terminal before concluding anything. Airport arrival halls are reception dead zones, and a first network registration needs a decent signal to complete. A surprising share of “broken” eSIMs fix themselves at the taxi rank.
9. Force LTE instead of 5G
Four bars of 5G with nothing loading is its own known failure: high-frequency 5G bands hand over badly in coverage transition zones. In the eSIM line’s settings, set the network mode to LTE/4G only. LTE has better range and more mature roaming agreements, and plenty of travel eSIM problems end right here.
10. Update your phone’s software
An out-of-date OS occasionally mishandles eSIM registration. If you are on wifi, install any pending update.
11. Reset network settings, as the true last resort
This clears saved wifi passwords and cellular settings but leaves eSIM profiles installed, on current iOS and Android versions. It fixes deep registration tangles nothing else reaches. Do it only after everything above, and never confuse it with deleting the eSIM itself, which remains the one unrecoverable move.
If it still will not work
If you have worked through all eleven and you are still offline, contact your provider’s support through their app while you are on wifi. The better eSIM companies answer connection issues on chat within about half an hour, around the clock, and a good support experience is one of the things we weigh in our reviews. When we ran support checks across our providers, none took more than ten minutes to sort a connection question, and reaching a human usually took under a minute, except where an AI answer layer sits in front, which can take several increasingly firm asks. Providers with round-the-clock human support are worth the small premium for exactly this moment.
If support cannot fix it, that is a genuine mark against the provider. When a provider we recommend fails at the “it just did not work and nobody helped” stage, that goes in the review, because a cheap plan that leaves you stranded is not cheap.
Avoiding this next time
Two habits prevent almost all of it. Install and activate the eSIM before you fly, while you are on trusted wifi and have time, so you land with it already working: the iPhone walkthrough takes five minutes and ends with exactly the landing routine this page exists to rescue. And check your phone is eSIM-capable and unlocked before you buy. Our full standard for what we verify is in how we test.
FAQ
Why does my eSIM show full signal but no internet?
Signal bars belong to the network; data flow belongs to your settings. It is almost always data roaming switched off on the travel line, or the wrong line set as default for data. An APN mismatch is the distant third suspect.
Should I delete and reinstall a broken eSIM?
Not until support tells you to. Most QR codes are single-use, so deleting can turn a fixable problem into a dead plan. Every other step in the checklist is reversible; deletion is not.
My eSIM worked yesterday and stopped today. What changed?
Usually one of three things: the data ran out, the validity window closed, or the phone quietly fell back to your home line. Open the provider app and check remaining data first; it answers the question more often than any setting does.